Sunday 20 September 2015

V8998 - My first solo dress

I'm really excited about this one, I was browsing dress patterns a few Saturday nights ago, as you do, and absolutely fell in love with it.  Then was having a look through a fabric site (again, as you do) and found the absolute perfect fabric for it.  So on impulse, I decided to go for it.  As luck would have it, the pattern size matches my size perfectly, so I don't have to do any pattern adjustments at all.  Some fitting adjustments might be needed later as I'm on a HUGE diet, but I can deal with that when it happens.

Firstly, the pattern and the fabric:


Oh lord, I love that fabric!  It looks pretty garish on the picture, but that's only close up, from a distance, you can't really see what the pattern is.

Anyhoo, onto the making.  Firstly, I read the instructions that came with the pattern, then again, then once more for good luck.  I think I may have been stalling at this point.  Then got onto cutting out of the pattern, very carefully, while fending Newt off as she realised that she loves tissue paper and started leaping across the paper.  Luckily it's stronger than it looks and it remained reasonably in tact. I stuck the skull fabric in the wash, and then took to pinning the cut out pattern pieces to the interfacing.  I got some sew on interfacing, I wasn't too sure what to get, but I got some from the same place as I got the fabric.  I've not used it before, so I've had a look at how it works, as the stuff that I got appeared to be cut to size off a roll and wasn't in a pack with instructions.

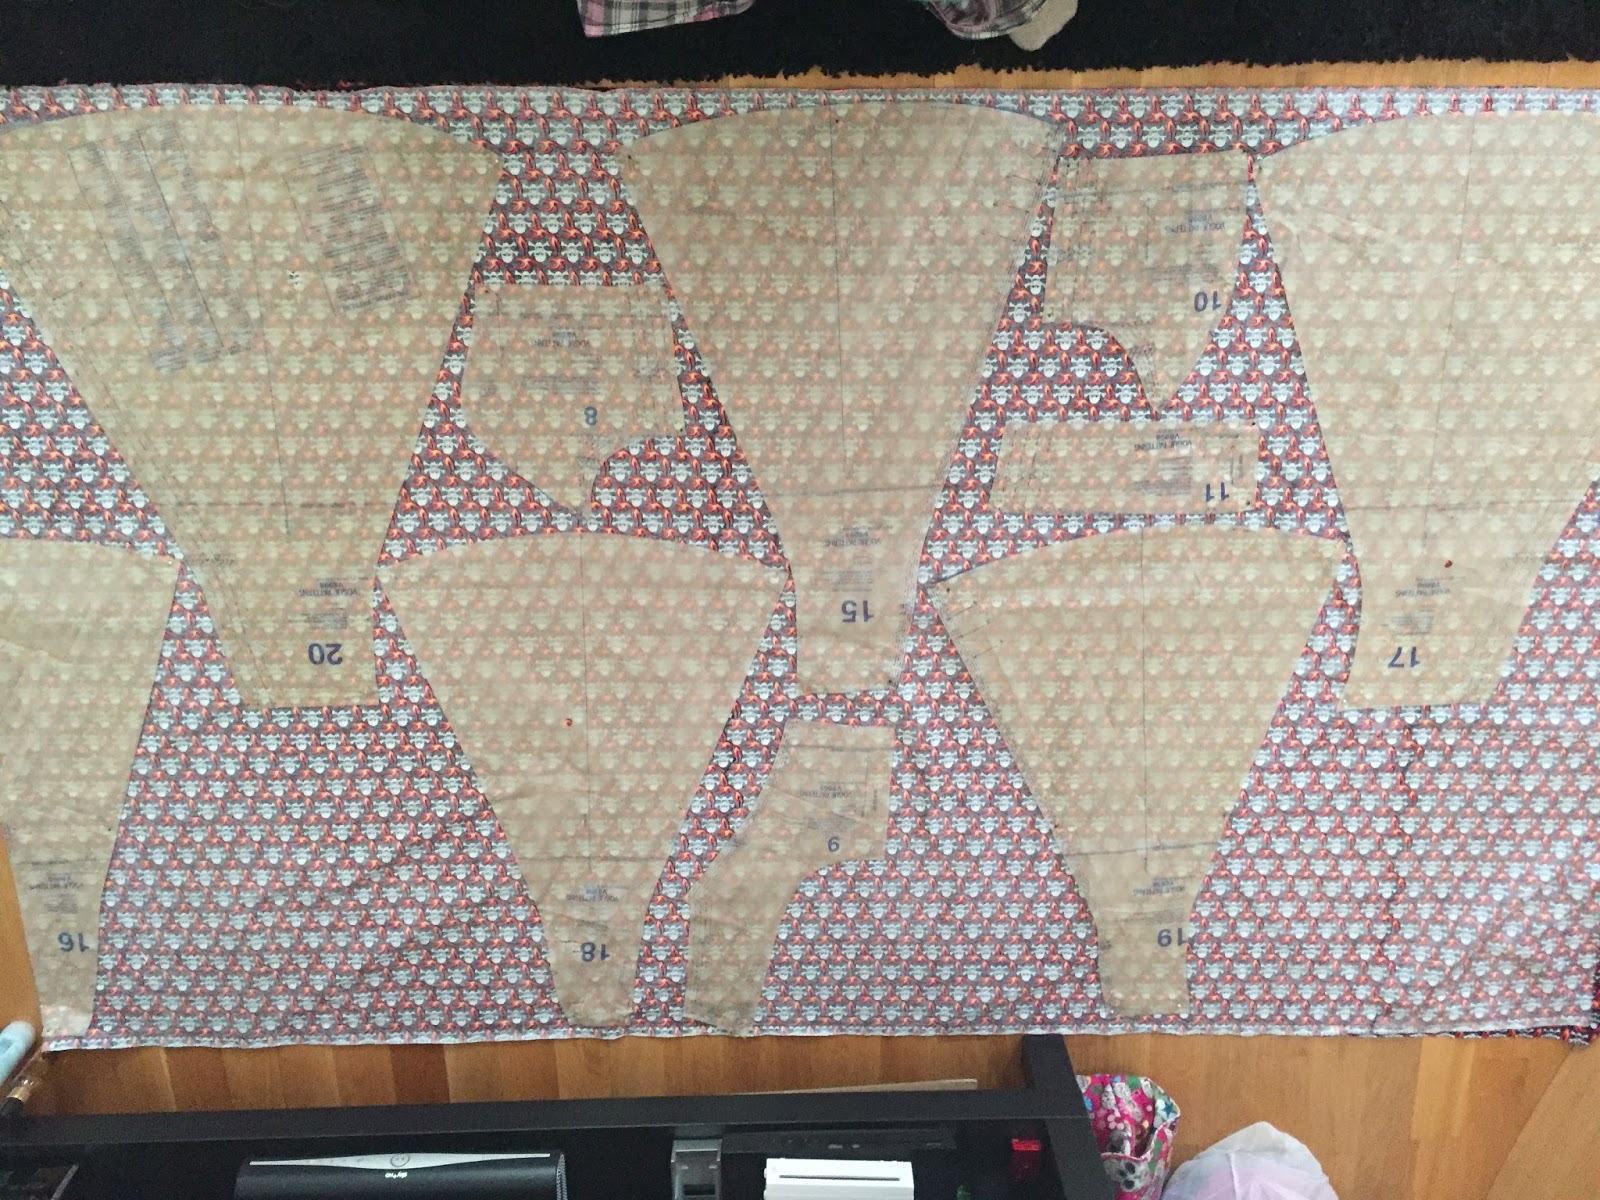
I'm not especially keen on cutting pattern pieces out, I haven't quite got a technique that I gel with yet, and my cutting isn't massively accurate, but seems to be accurate enough to get decent results.  I did notice that the pattern was on the crossgrain, so the skulls were facing the selvedge, and I didn't fancy having sideways skulls on the dress.  So I needed to do some creative cutting, I was advised that cutting all the pieces on the crossgrain instead of the grain would be ok.  Getting all of the pieces on the fabric that I had took some serious Tetris skills.  At one point I thought I might have to get extra fabric, but I was lucky and managed to squeeze them all on.

I then worked through all the instructions, which were pretty comprehensive and easy to follow. and at all of the stages it was looking pretty good.  Going to just post a few photos from the process:

Bodice mostly completed, just need some
hand sewing


My first go at understitching
Skirt sewn up, without lining
Skirt and bodice together
Totally finished - back
Totally finished - front


Me trying on the dress first time (sorry it's not
a great one, I hate photo's of myself!)
Everything complete, including
horsehair and with the little cardigan
that I'll wear with it


I agree, not to everyone's taste, some may indeed recoil in horror, but I'm pretty smitten!  I'm going to Vegas in November, and I have this dress in mind for that, reckon it should fit in nicely.  I'm pretty pleased with it, all the seams line up and the band across the middle isn't wonky.  The zip isn't the greatest zip I've ever put in, but once the little cardigan is on to cover the tops of my arms,  and should cover the zip nicely.  Now that's my first solo dress finished, I plan to do a nice pair of easy pyjama's and a matching robe.  Should give me a nice rest from the stress of linings and zips, and no finger blistering hand-sewing!

Saturday 19 September 2015

Pattern Weights

I've been pondering pattern weights for a while as I'm still not keen on using pins for pattern cutting, it just doesn't feel right to me.  I've researched a ton of options online, and was going to just buy some from eBay.  But then came across a blog that said about little fabric bags full of rice that can be used.

I got a set of quilting squares from eBay that were all Cath Kidston, so it'd match the other stuff in my sewing room.  It was a nice cheap little lot and had a nice amount of variety, saved me having to think what patterns I wanted.

When they arrived, I picked out the ones that I liked, and cut 24 of them into 3in by 3in squares.  And also cut half inch strips out of some of the bits that were left.  I then went about matching them up.  I wanted to have the ribbon, top fabric and bottom fabric to be different on each one.  I could've used ribbon for the handles, but didn't have anything in the right colour, so thought that strips of fabric with a sewn edge in a contrast colour would make a nice touch.

After sewing the edges of all my handle strips, I then sandwiched them in between the top and bottom bits of fabric, (right sides together) and the top side of the handle strip facing the right side of the bottom piece of fabric (see photo below).


I then sewed round the edges using only 1/4in seam allowance, and left an opening.  I also put little 'legs' on the seam to help with the turning out and sewing up the hole (a handy little tip that I found while blog trawling).

Then turned them inside out, making sure that the handle strip was on the top, and then filled with rice.  I found that 2 tablespoons of rice was about enough. Then carefully hand-stitched the opening closed.

I've not done any pattern cutting since making them, so will have to update this when I have to say how they go.  Hopefully they end up being a good little alternative to pins!

Monday 14 September 2015

Custom Building Veronica

When I decided to get into dressmaking, I decided that I could do with getting a dressmakers dummy.  I live alone, don't have a sewing buddy and have some mobility issues, so fitting things to myself can be a bit of an issue.

I had a look at the choices for dressmakers dummies, and saw that the choices were pretty varied.  I decided that seeing as I'm in the middle of a diet, an adjustable one would be the best option.  I went for an Adjustoform Supa-Fit Deluxe , mainly because it was on sale, it was adjustable, and came with the chalk hem marker.

Once it arrived, I put it together and then went about changing it so it fit me.  I took the following measurements of myself:
  • Upper bust
  • Bust
  • Midriff (just below the bust where the band of the bra goes)
  • Natural waist
  • High hip
  • Full hip
  • Side neck to apex (fullest part of the bust)
  • Bust apex to centre front waist

I then took to adjusting the dress form, the little dials were really tricky!  I had to use a pen for some of it cos the dials were quite stiff.  I got the size of the form to about half an inch smaller than my actual size then got one of my bras that is the style that I wear all the time, but I don't use because of the colour (you'll see why in the photo) and put that on it, and padded it out with wadding.  Measuring as I went, I then added wadding to the appropriate areas.  Constantly measuring and comparing was the key, adding bits as necessary.  Once I was happy with the overall shape, I then covered the whole lot with some cheap conforming bandages that I got from the 99p Store.  Not amazing quality, but seeing as it was only going on the form, it didn't really matter.  Handily it comes in different sizes, so was useful for either covering large areas, or smaller areas.  I made sure that I kept the 'ditch' between the bust, so it didn't have that rather unsightly 'mono-boob' look.


Seeing as that look isn't terribly pretty, I wanted to make a cover.  I got some cheap teal Spandex from eBay and using my measurements, I made a template for the material.  I took an inch off each edge so that the stretch material would be nice and snug.   I didn't have to be hugely accurate as it would stretch out, but I got the basic shape sorted.  It was the first time that I had sewn stretch material, and it was a bit scary!  But I managed to get it together ok.  Then just needed to put it on the form and make sure that it fitted correctly.  Luckily because it's stretch material, the bottom folds under the form, and doesn't need any finishing.


One funny thing is that I've always had a slightly distorted view of my figure, and always thought I was terribly large.  But actually making this and seeing a 3D version of myself that is the same size as me has made me realise that I'm not actually as huge I thought I was.  I realise that I still need to lose weight, but I'm not the elephant that I once thought.  So a bit of a bonus!

I also plan to mark the appropriate lines with ribbon so I have accurate lines that I can use for centre waist, neckline, etc. but I don't really want to do that until I've lost the weight that I want to lose, then I'll do the final adjustment of the form, re-sew the cover and fit the ribbon lines, I'll update that later when I get to it.

Oh and as with every good dress form, she has a name.  She's called Veronica.  Just watch Avengers: Age of Ultron, and you'll understand :)

Organising Patterns

Anyone that knows me knows that I love organising things.  A trip to a stationary store is a bit of a treat for me and I'm quite partial to a label maker.  So with all the new sewing stuff that I've been getting, I felt that a bit of organising was in store.  I've found that Really Useful boxes are in fact really really useful and they're a new addiction of mine.  But I was looking for a way to organise my patterns.  A small pile of them was forming in my sewing room, and Newt was getting inquisitive, so a slightly more sturdy solution was needed.  I had a bit of a think and figured that some A5 clear plastic pockets would do the trick.  They mostly come in landscape, but I managed to find some portrait ones on eBay and they were pretty cheap.

They arrived this morning, so I put one pattern into each, and labelled each one so they're easy to find.  I was looking for a box to put them all in and found that the empty Lego Wall.E box (I went nuts at the weekend in Legoland and bought a ton of stuff) was the perfect fit.  I plan to cover it with my usual sewing room fabric so that it matches.  I now have about 20 pockets to fill with new patterns, so I'd best go shopping!

Sunday 6 September 2015

My favourite notion and the lies that we can get told

Now, to be entirely honest, as a new sewist, I had no idea what a notion was.  After my last sewing course was slightly ruined by the very annoying teacher that spent more time talking about her child than teaching us anything, I got a bit hooked on Craftsy courses.  I can sit and watch them in bed on my iPad and they're really very good for refreshing your memory when you get stuck, and some of them are very cheap.  And the perks of not having to endure the torture of discussing possible secondary school options for a child that is only currently 8 months old.

I spotted a course that looked interesting that was about notions, so I went for it.  At the moment, I'm going for courses that look interesting and picking up a load of tips and tricks.  Well, it was well worth it because I discovered a lot!  Unfortunately it now means that I have a list of things that I want to buy that's as long as my arm, but for some very useful gadgets.  I had absolutely no idea that tailors chalk could come in mechanical pencil form (I LOVE a mechanical pencil!) and something called a magnetic seam guide.  The seam guide on my machine is pretty good as standard seam guides go, but I figured that extra help couldn't be a bad thing.

So, if you're not aware, the magnetic seam guide is a little block of metal with a magnet in the bottom.  You can place the magnet onto your metal plate seam guide on the correct line.  So as here, I wanted a 5/8th in. seam, so I put it against that line.


Now, to the aforementioned lies.  When I first got my sewing machine, I noticed that stitch one was to the left, and stitch two was in the centre.  Using my instinct, I decided to use stitch one for main sewing.  When I went on my last course (with the overly motherly teacher), I took my machine with me so I could get to know it a bit more, and she told me I was doing it wrong.  Stitch one was for zips as it was over to the left, and stitch two was for normal stitching as it was in the centre and stitch one was for zips as it was to the left.  So I went about my sewing using her advice.  It was against my instinct, but she was the experienced one.

A few fairly minor projects went by, and then I started a cushion.  Now I'd made a mistake on this cushion when marking it out, I marked it too small, I'd forgotten to put the seam allowance on, so I corrected it.  Which meant that I had a mark 5/8th in. on the fabric.  I had my new magnetic seam guide and decided to give it a whirl, put it on correct line.  Put the fabric in, butt it up against the seam guide, stitch set on stitch two, and noticed it...  The needle wasn't near the line.  So my instinct gave me a tap on the shoulder.  "How about you try stitch one?" it whispered to me.  So I flicked the dial to stitch one, and the needle moved to exactly where the line was on the fabric.  So therein lies the moral of this story.  Sewing machines are very varied, and while the teacher might know an awful lot about an awful lot of things, they might not know the intricacies of your exact machine.

Luckily, I'd not done any harm.  The dress that I had just started, I'd only just finished the outside of the bodice, so it was just a case just running over it again with the correct seam allowance.  The dress has princess seams, so 1/8th of an inch difference over six seams ends up to be quite significant over the entire garment.  Thankfully I'd messed up the marking up of the cushion!!

Hopefully news on the finished dress soon :)