Saturday, 5 March 2016

A quick mention for Sewing Kit HD

I don't know about you, but I'm forever searching for the perfect app that is going to revolutionise my life.  I think I've found the app to organise the sewing part of my life.  And it does pretty much everything.

Organising and logging:
Patterns
Fabrics
Threads
Books
Projects

Loads of stuff!!  It took me a while to get all the data in there but it's been super helpful.  I went to the Knitting and Sewing show at Kensington Olympia on Thursday and partway through a pattern buying frenzy, I wondered if I already owned one of them.  Pulled out my phone, typed in the pattern number and it came up that I didn't have it.  Bingo.  I'll never accidentally buy two of anything ever again!!

And you know how annoying it is when you leave a project for a while and you forget what thread you were using?  Yeah it cheeses me off too.  But with this, you can add fabrics, threads, patterns, etc. to a project and you'll know I'm future what you used.

It's really pretty cool

Look for Sewing Kit HD on your phone App Store


Sewing Room Reshuffle and the Godsend that is Pegboard

My sewing room has been a bit ad-hoc, and I just ended up putting things were they seemed to go at the time without much forethought.  And once I got my overlocker (will need to do a review of it at one point), I realised that my room wasn't very well organised at all.  I ended up having to keep the overlocker on the floor, and when I needed it, I had to push my sewing machine out of the way, lift the overlocker up, use it, put it back on the floor, then pull the sewing machine into the correct spot again.  Was a total pain.  My best friend was due to come down and he said that he'd help me reorganise it and move the furniture around.

Then I had a stroke of genius.  Pegboards.  I love buying notions, and the only thing I love more than buying notions, is organising them.  And I realised that if I had a pegboard attached to the back of my main sewing desk, I could use hooks to hang scissors, packs of pins, etc. and have them all within arms reach of my sewing machine.

My usual first search point is eBay, and I found a company that sells pegboard and hooks.  I got one that was pre-cut to the exact size of my desk. I also got some L shaped brackets that I could screw under the desk and and rest the pegboard between the back of the desk and the bracket.  Simples.

Now seeing as the pegboard is a hideous shade of brown and my sewing room is on its way to having a vintage feel, it didn't really go.  I got some primer and some beautiful powder blue paint.  While I was at it, I figured I'd add some rose decals to make it look like the Kath Kidston fabric that I use for the soft furnishings in the room.

First of all I covered the pegboard in a couple of coats of the primer, it covered well and knocked the brown right out. Then went with a couple of coats of the powder blue.  I left it so it was slightly patchy as I wanted it to have a slightly worn feel.  I then added the rose decals.  They were pretty easy to attach following the instructions.  I won't go into how I did it as you might have a different type of decal that has different instructions.
(I left a gap at the bottom so the decals weren't covered by the desk)

When my best mate turned up, we moved the room around a bit.  Used my big Ikea shelves as a room divider to make it nice and cosy, attached the L brackets to the desk, and moved the desks around so I had a nice L shape desk area.

I got all the hooks in, and my notions organised, and tada, beautiful sewing room where I can sew and overlock without having to keep lifting, and I have all my notions organised and within easy reach.

I also got a Really Useful drawer unit to keep my ever growing fabric stash in.  And I got some adhesive pockets that I stuck on the front of the drawers, and printed off some cute labels in a vintage font.  When I use some fabric and the drawer is empty, I can swap over the label to keep up with the stash.


The other side of the room divider is my fitting area, where Veronica (my fitting dummy) stands, and I can change without people seeing me through the balcony doors, handy!  I'll take some more photos the next time it's tidy and update.

I have a few projects on the go, and will be updating on those, so check back soon :)

Happy sewing!

Saturday, 23 January 2016

Sew Over It - 1940s Tea Dress


It seems like such a long time ago that I started all this and I was reviewing sewing magazines, but the one that I went with (Love Sewing) came with a kit from Sew Over It for a pink skirt.  I haven't finished the skirt yet as its not something I'd wear, so I don't really have much motivation for finishing it.  But I liked the concept and I liked the pattern and instructions.  I had a look at their website and spotted that they had a load of patterns that looked beautiful and what was really helpful is that they have their fabrics also categorised by what suits what patterns.  Makes it very easy.

So when I went to the sewing show at Alexander Palace, I spotted that they had a stall and had a look.  They had the 1940s tea dress pattern and some beautiful fabric that I loved (Amelia Petal).  Seeing as I was on a fabric buying high, I went for it.  Anyone that knows me knows that I have a thing for tea dresses.

I won't go through the process that I took as I just followed the instructions.  I didn't alter the pattern at all as I just wanted to get it done as is.  I still don't have my head around the whole pattern alteration thing, but I'll probably look at it one day, maybe.  But I did get to make my first self covered buttons.  That was interesting!!  But it really makes the dress I think.

It was all pretty straightforward, but I did notice some errors in the instructions when it came to the sleeve construction.  It was really very annoying, and I found that I was sewing, unpicking, sewing and unpicking.  I was pretty fed up and went searching for a blog that maybe covered it and would be able to clarify.  Luckily I found that Sew Over It did a sew along that was most helpful and the instructions were considerably better than in the booklet.  So if you plan to do this dress, definitely use the sew along instructions too http://sewoverit.co.uk/blog/sewalongs/1940s-tea-dress-sewalong/

I'm really pleased with the finished dress.  I think it looks really quite pretty and the fabric is beautiful. I'm also very pleased with the fit.  Considering the fact that I did no pattern alterations, it fits really quite well.  Despite the issues with the instructions in the booklet, I'll definitely give other Sew Over It patterns, they might just need a bit of patience.

And just a small mention of my new tattoo
that can be seen in the picture - yes that is
a Mexican Sugar Skull Lego head :D

Bit of a catchup - Skull Dress went to Vegas and Maker's Workbook

So, it's been a while since my last post, but trust me, I have been sewing!  I went off to Vegas with my skull dress, and I wore it when I went to see Penn & Teller.  They have a thing where they go out into the lobby after and you can meet them if you hang around.  So my dress met Penn & Teller!


That was pretty damn cool!

So after coming home and feeling terribly sad that I was no longer in Vegas, England was cold and I was in no mood to go back to work.  But I got an email that cheered me up somewhat.  I get emails from the guys that sell Swedish Tracing Paper, and they said that they had a new product coming up.  the Maker's Workbook.  It looked divine! You can find full details here http://www.makersworkbook.com

I've tinkered with my own notebooks since starting sewing, and they've never really panned out.  They were just blank notebooks and I never really knew where to start.  So I figured that I'd invest in this and see where it took me.  I was delighted when it arrived as it's beautifully crafted.  The information that it prompts is also incredibly useful.  I can see me referring back to this in future when I repeat patterns.

One thing I really love is that the fabric swatch area changes on each page.  Its annoying when they're in the same area every page, as then there's an annoying bulge in one area of the book.  When they're in different spots, it evens it out a little.  Good thinking guys!

I think instead of rambling on, a few pictures of how I've used it so far will suffice.


Monday, 5 October 2015

Cute little washbag

I've been going crazy recently and just watching as many sewing videos as possible to learn what I can.  And sewing instruction videos are ridiculously relaxing too!  So I came across the National Sewing Circle and they have a bunch of videos.  Not as good as Craftsy, but cheaper (they are doing offers at the moment where you can sign up for $8 and get a years membership and can view all their premium videos).  So I was mooching through the videos one evening and saw a video on how to sew a boxy zippered pouch.  I had been thinking of making one for a while and also wanted to make one for my best friend as a gift (can't say more in case he sees it here!).

I am still getting the hang of taking photos at every step, I get over excited and just race ahead, but I'm getting better.  So this is more this is more of a picture show off than a tutorial.  While I'm still getting the hang of the taking photos thing, there are some very good blog tutorials that have pictures (they're obviously far superior bloggers than me!).

I used a Marvel Avengers material that I got from eBay as the outside and for the lining, a black rip stop polyester from Minerva Crafts (I love those guys!).  And I also used a green zip that I had laying around.

When I make the bag for my best friend, I'll take more pictures and do a proper tutorial, I promise :)

But for now, some pictures

Overall finished bag

Handle and little zipper tab

Zipper tab on the other end

Lining of the bag (although not much to see)

Sunday, 20 September 2015

V8998 - My first solo dress

I'm really excited about this one, I was browsing dress patterns a few Saturday nights ago, as you do, and absolutely fell in love with it.  Then was having a look through a fabric site (again, as you do) and found the absolute perfect fabric for it.  So on impulse, I decided to go for it.  As luck would have it, the pattern size matches my size perfectly, so I don't have to do any pattern adjustments at all.  Some fitting adjustments might be needed later as I'm on a HUGE diet, but I can deal with that when it happens.

Firstly, the pattern and the fabric:


Oh lord, I love that fabric!  It looks pretty garish on the picture, but that's only close up, from a distance, you can't really see what the pattern is.

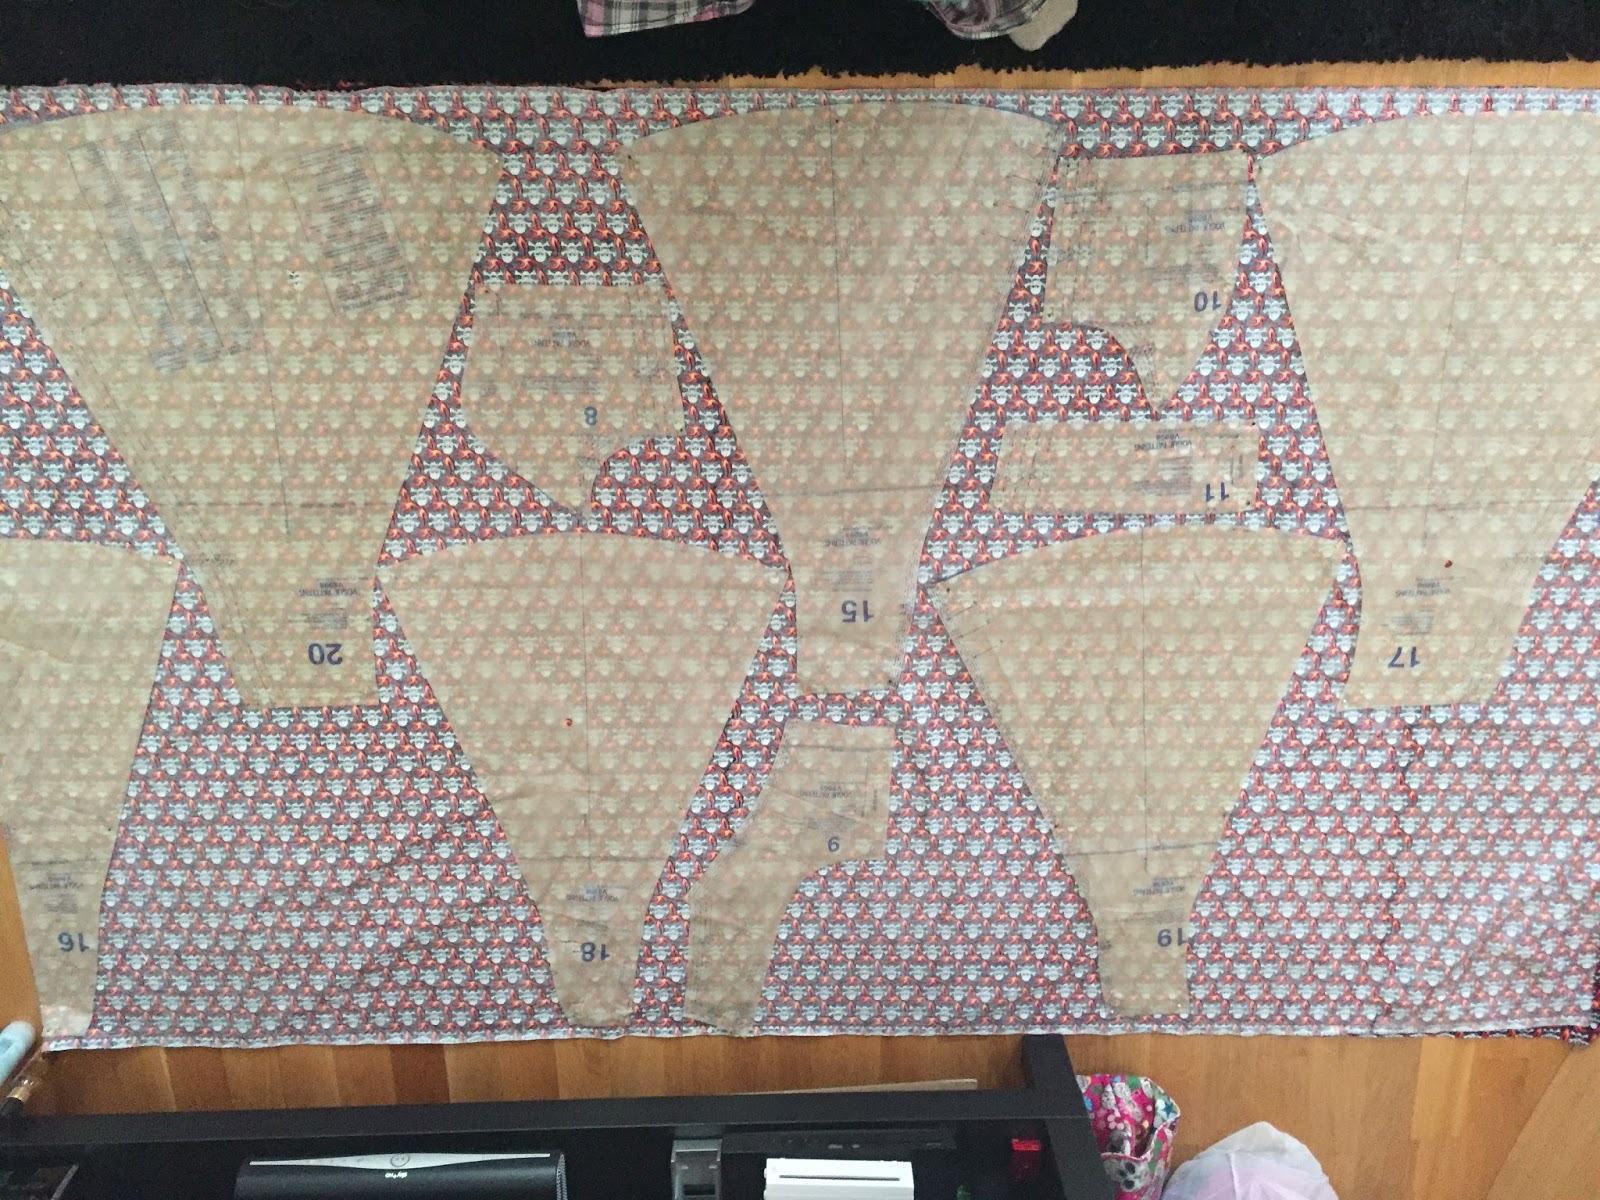
Anyhoo, onto the making.  Firstly, I read the instructions that came with the pattern, then again, then once more for good luck.  I think I may have been stalling at this point.  Then got onto cutting out of the pattern, very carefully, while fending Newt off as she realised that she loves tissue paper and started leaping across the paper.  Luckily it's stronger than it looks and it remained reasonably in tact. I stuck the skull fabric in the wash, and then took to pinning the cut out pattern pieces to the interfacing.  I got some sew on interfacing, I wasn't too sure what to get, but I got some from the same place as I got the fabric.  I've not used it before, so I've had a look at how it works, as the stuff that I got appeared to be cut to size off a roll and wasn't in a pack with instructions.

I'm not especially keen on cutting pattern pieces out, I haven't quite got a technique that I gel with yet, and my cutting isn't massively accurate, but seems to be accurate enough to get decent results.  I did notice that the pattern was on the crossgrain, so the skulls were facing the selvedge, and I didn't fancy having sideways skulls on the dress.  So I needed to do some creative cutting, I was advised that cutting all the pieces on the crossgrain instead of the grain would be ok.  Getting all of the pieces on the fabric that I had took some serious Tetris skills.  At one point I thought I might have to get extra fabric, but I was lucky and managed to squeeze them all on.

I then worked through all the instructions, which were pretty comprehensive and easy to follow. and at all of the stages it was looking pretty good.  Going to just post a few photos from the process:

Bodice mostly completed, just need some
hand sewing


My first go at understitching
Skirt sewn up, without lining
Skirt and bodice together
Totally finished - back
Totally finished - front


Me trying on the dress first time (sorry it's not
a great one, I hate photo's of myself!)
Everything complete, including
horsehair and with the little cardigan
that I'll wear with it


I agree, not to everyone's taste, some may indeed recoil in horror, but I'm pretty smitten!  I'm going to Vegas in November, and I have this dress in mind for that, reckon it should fit in nicely.  I'm pretty pleased with it, all the seams line up and the band across the middle isn't wonky.  The zip isn't the greatest zip I've ever put in, but once the little cardigan is on to cover the tops of my arms,  and should cover the zip nicely.  Now that's my first solo dress finished, I plan to do a nice pair of easy pyjama's and a matching robe.  Should give me a nice rest from the stress of linings and zips, and no finger blistering hand-sewing!

Saturday, 19 September 2015

Pattern Weights

I've been pondering pattern weights for a while as I'm still not keen on using pins for pattern cutting, it just doesn't feel right to me.  I've researched a ton of options online, and was going to just buy some from eBay.  But then came across a blog that said about little fabric bags full of rice that can be used.

I got a set of quilting squares from eBay that were all Cath Kidston, so it'd match the other stuff in my sewing room.  It was a nice cheap little lot and had a nice amount of variety, saved me having to think what patterns I wanted.

When they arrived, I picked out the ones that I liked, and cut 24 of them into 3in by 3in squares.  And also cut half inch strips out of some of the bits that were left.  I then went about matching them up.  I wanted to have the ribbon, top fabric and bottom fabric to be different on each one.  I could've used ribbon for the handles, but didn't have anything in the right colour, so thought that strips of fabric with a sewn edge in a contrast colour would make a nice touch.

After sewing the edges of all my handle strips, I then sandwiched them in between the top and bottom bits of fabric, (right sides together) and the top side of the handle strip facing the right side of the bottom piece of fabric (see photo below).


I then sewed round the edges using only 1/4in seam allowance, and left an opening.  I also put little 'legs' on the seam to help with the turning out and sewing up the hole (a handy little tip that I found while blog trawling).

Then turned them inside out, making sure that the handle strip was on the top, and then filled with rice.  I found that 2 tablespoons of rice was about enough. Then carefully hand-stitched the opening closed.

I've not done any pattern cutting since making them, so will have to update this when I have to say how they go.  Hopefully they end up being a good little alternative to pins!